Punisher
In this build thread, I’ll walk you through building the Punisher vest based on the television series. The pattern for this vest is available in my Etsy shop.
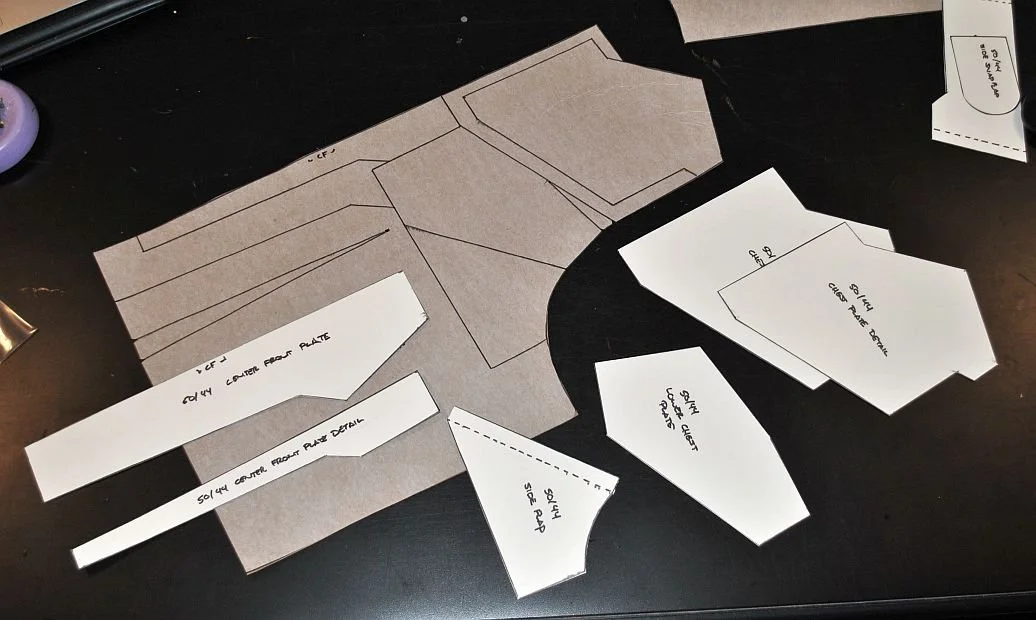
Let’s get started with the front of the vest. Below are the base layer pattern and the detail shapes that form the ‘armor’ plates. Note that I've added darts to a garment that typically wouldn't have them in real life. I did this for two main reasons:
I wanted to add some contouring to the piece to fit it well under the coat.
After all, he is a comic book character, and I wanted to accentuate the chest, narrow the waist, and create a more exaggerated 'V' shape to the torso.
The first step is to create the base layer for the front. The base layer is cut in one piece on the fold of the fabric. I’m using a 420D black Cordura packcloth as the primary fabric and a grey cotton twill as the lining.
The base layer is cut out of the packcloth, and then I used Super77 spray mount to adhere it to the grey lining. The darts and the chest and lower front were then stitched down. At this point, I also finished the edges around the arms with bias tape and serged the top edges to finish them. If you don’t have a serger. you can use bias tape to bind the edges or cut extra seam allowance and use that to hem these edges.
I also used a silver Sharpie to mark the center front line of the vest to make aligning all the details easier.
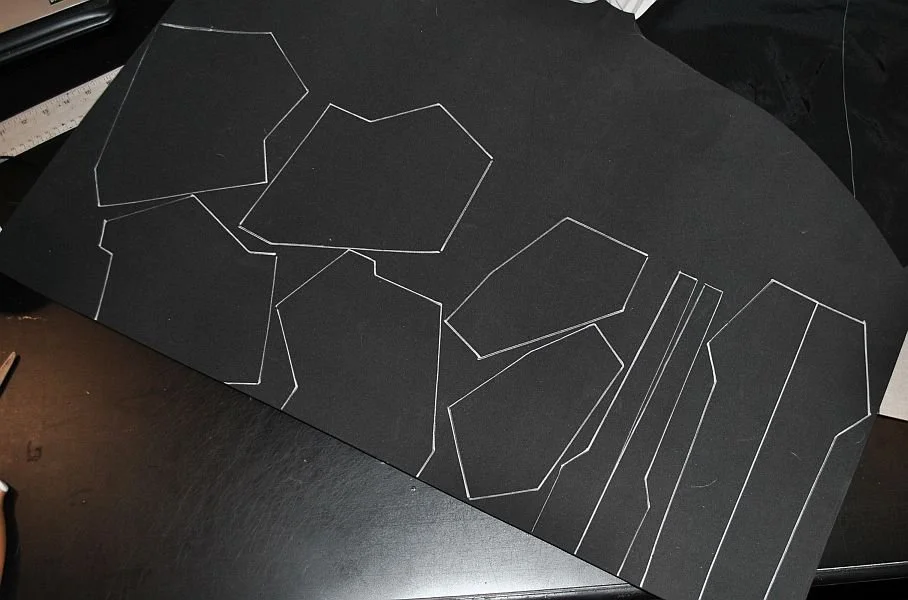
Next, I traced all the detail plates for the front onto 2mm black EVA foam.
The front of the vest is built from the bottom up, so I began with the large center front plate that extends from the bottom edge up to the chest.
The plate was cut from the foam and adhered to the back of the backcloth with spray mount. The packcloth was cut out around the foam piece with a .5” allowance. I clipped the corners of the packcloth, sprayed the back of the piece with Super77 and then wrapped the packcloth to the pack of the plate. (Note that the top edges of the packcloth do not need to be wrapped to the back as they will be covered by the chest pieces.)
The plate is stitched down to the base layer, matching the bottom edge and the center fronts. I like to use a double line of stitching because it adds a more ‘tactical’ look, but it’s not necessary.
At this point, the bottom edge can be finished with bias tape encasing all layers.
Next was the smaller detail plate on the abs. For this piece, we want a seam down the center front, but we can create the entire detail in one piece to make alignment and assembly easier.
I cut two pieces of packcloth approximately 1” larger than the foam piece on all sides. I then stitched these pieces (right sides together) along the long edge with a .5” allowance. I then sprayed one side of the foam pieces and placed it against the stitching line on one side.
The other foam piece was sprayed and attached to the opposite side against the stitching, matching the top and bottom edges of the first foam piece.
The excess packcloth was cut away (again leaving a .5” allowance), the corners clipped, the back of the entire piece sprayed with Super77, and the allowance turned to the back (except the top and upper side edges).
At this point, I needed to add the center strap details. Two 8” pieces of 1.5” nylon webbing were cut and tacked to the sticky back of the plate. The lower strap is placed 1.5” above the bottom edge, and the upper strap is placed 2.5” above that one.
This piece should match the top edge of the larger plate (it will extend to approximately 1.5” above the bottom edge) and the center front line. I stitched the plate down through all layers on either side of the center front seam to secure all the pieces.
Next, I added a 1.5” tri-glide to each strap. I measured the straps so that the center of the tri-glide aligned with the edge of the larger plate. Any excess strapping was trimmed away (leaving .5” to tuck back under the foam plate). When all four tri-glides were in place, the entire outer edge of the plate was stitched down.
The next piece to create was the ‘looped’ strap that goes between the two nylon straps. For this piece, I cut a piece of packcloth 18” by 2” and spray-mounted it to the back side of the packcloth. I cut these strips out with a .5” allowance on the long sides, turned them under and stitched the edges down to finish them.
I used painter’s tape to mark the bottom edge of this strap to ensure I kept it in a straight line while sewing the details. These straps are attached to the vest under the larger center front plate - meaning that some of the stitching will need to be removed between the tri-glides on each side. Tuck the end of the strap under the edge of the plate up to .5” and restitch it to secure the end of the strap in place.
Using a .5” dowel and a zipper/cording foot, I stitched all the loops on the strap - there are nine on each side.
Once all of the loops were sewn down, the strap was trimmed to accommodate a 2” extension and .5” fold under. 1” slide lock buckle was looped through the non-adjustable side of a 1” slide lock buckle, and the strap was completed and sewn down.
Next, I completed the front straps that were started with the center front plate and tri-glides. I cut four pieces of 1’5” nylon webbing.
Put the webbing through the loose sides of the tri-glides and securely stitch the webbing down on either side of the large center plate. Thread the other end of the strap through the non-adjustable side of a 1.5” slide lock buckle and securely stitch it in place so that the buckles align to the side edge of the vest.
At this point, the lower front of the vest is complete.
Next were the soft ‘plates’ and underarm straps. I wanted these plates to have dimension but also be soft and flexible, so I used headliner foam rather than EVA as the base.
Like the others, they were cut out of the foam first and covered in pack cloth. All edges were turned under and finished except the long edge that will go under the chest plate.
Using the pattern to mark the placement points, the plate was sewn down, and, like the lower ‘loop’ straps, a 1” slide lock buckle was secured using 1” nylon webbing.
Before the chest could be added, the shoulder straps needed to be attached. These were also done with headliner foam as the base and wrapped with packcloth. They were then decorated with grommets (you could also use snaps here), 1.5” webbing, and 1'.5” tri-glides.
Note that when you stitch the webbing down to the back of the strap, you want to curve the strap. This will make the webbing buckle a little when laid flat, but it allows the strap to curve over the shoulder without buckling under the webbing.
The shoulder straps should overlap the vest's edge by .5” and be sewn down to the front side of the base layer. The chest plate will cover this and ‘sandwich’ the strap edge between the chest plate and the base layer.
The lower chest plates and side ‘snap flaps’ were next. The plates were made like the other EVA-based plates, and grommet details were added at the top and bottom of each one.
The snap flaps are headliner-based and edges with thin bias tape. The snaps on these are matched to the loser chest plates. The flaps are sewn to the base layer first (similar to the shoulder straps) and the chest plates are added, matching the soft underarm plate and the side edges of the ‘abs’ plate.
Here is the vest so far, only missing the upper chest plates.
The upper chest plates are unique in that they have two layers of EVA foam before they are covered with packcloth. The two layers were cut and spray-mounted together. Then, like the ‘abs’ plate, two pieces of packcloth were cut about 1” larger than the plate on all sides. the two sides of the plates were then glued down on either side of the seam in the same manner as the ‘abs’ plate.
Note the multi-layer side of the foam assembly goes face down on the back side of the packcloth.
At this point, I secured the layer detail on the chest plates by using a zipper/cording foot to stitch the packcloth against the layer detail.
Next, I added a layer of headliner foam behind the chest plates. This is optional, but I like the extra dimension and shape it adds to the chest. If you add this layer, you’ll need to include up to .75” of allowance when trimming the packcloth around the plates.
Like the other plates, I sprayed the entire back of the chest with Super77, turned the extra packcloth to the back (on all edges) and placed it on the front assembly.
Like the abs, I stitched on either side of the center front to secure the pieces and then worked my way around each side.
It takes some moulding to make the chest fit as the plates are meant to form around the dart in the side of the chest. The finished upper edges of the base should align just under the edges of the chest, the arm edges should overlap slightly, and the bottom edges of the chest should be moulded to match the foam edges of the lower plates (catching and covering the edges of the packcloth on these pieces.
It’s easier to paint the skull on before the back is done and attached, so that was next.
The skull can be done in several ways, from printing it and spray mounting it to the vest front to free-hand painting it. I had some printable vinyl decals in letter-size sheets, so I decided to use those.
I printed the skull on multiple pages and cut away the parts needed to make a template. Working around the design, page by page, I got all the decal stencils attached to the vest and masked off the rest of the front with plastic and tape.
I used white spray paint to lay down the base colour for the skull and, after pulling up the stencil, hand-painted the details and blending.
With the front of the vest complete, it was time to assemble the back. Like the front, the back was cut in the fold. lined with grey cotton, and the back darts sewn. The arm and bottom edges were also finished with bias tape, and the sides and top edges were serged to finish them.
A 2.5” belt loop was also added to the bottom center back. The lower straps, which will connect to the ones in the front, were also added. These straps have to have enough length to be adjustable, so cutting them longer than needed to begin with is helpful. For this project, I cut each strap to 36” to be sure there was enough for the client to get the right fit, and then he could trim it as needed.
Each strap was sewn down from one back dart across to the other in a solid rectangle with reinforced lines of stitching at each end to make sure they were secure.
All of the straps have tri-glides to help secure the adjustments and keep them from flopping about. They were threaded through the adjustable sides of all the buckles from the front.
The center back shoulder detail was made with a headliner foam base and stitched down at the top and bottom edges. The shoulder blade plates were EVA foam based and the back sides of the underarm straps align to the bottom edges of these plates.
The shoulder blades were sewn down to secure them and the straps, leaving the top edges free. The back edges of the shoulder straps were then inserted into the upper back edge of the vest, and the shoulder blades were stitched down across the top to finish the vest and secure the straps.
The last piece to create was the belt. This consists of two headliner-based pieces, covered in packcloth and edged with bias tape. 2” wide elastic was used to connect the pieces in the back to provide extra flexibility in the fit. The straps in the front were created with 1.5” nylon webbing and a 1.5” slide lock buckle.
The sides of the belt should be 3” in height, but the rest of the measurements depend on the final fit of the vest and should be adjusted accordingly. Size 24 heavy-duty snaps secure the belt to the front of the vest on the sides, and the belt loop holds it in place in the back.
And here is the finished vest!


